Showing posts with label small spaces. Show all posts

Tuesday, January 8, 2013

home improvement: new cabinet door

When you come into our house through the front door, the downstairs is all one open space. The living room, spiral staircase, dining room and kitchen. On the end of the kitchen counter are display shelves, which you can see as soon as you walk into the house. They're probably intended for cookbooks and whatnot, but storage space is at a premium around here, folks, and I've always found these shelves to be a missed opportunity. But this problem was not insurmountable.

I didn't take a "before" photo, so, uh, just pretend there's no door in this photo. (Spoiler alert! We added a door!)


Here is how I created the door in four easy steps.

1. Call Dad.

2. Ask Dad to make a door for you.

3. Allow a few months to pass.

4. Install your door!


Haha! Didn't he do a great job? When my parents were in D.C. last fall, he took one of our other cabinet doors home with him, and he modeled the new door off of it. It's really impressive. He even matched the stain. Tony and I picked it up when we were in Ohio for Christmas and installed it when we got back.


So now the booze is behind a closed door, and I have room to store all of those extra pantry items that don't fit in our cabinets and previously were housed on top of the cabinets. So much better.


Problem, you've been surmounted.

Wednesday, November 28, 2012

decor: pirate trunk makeover

About a year ago, Tony and I stopped at a moving sale in our neighborhood and scored big time. I got a midcentury orange chair to match my living room decor for $5, some necklaces (including the one I wore to this wedding) for $1 each, flower pots for 10 cents apiece and a pirate trunk for $10. The stuff was priced to sell.

I've blogged before about the trunks in my house. (Exhibit A. Exhibit B.) I have five trunks and actually have been keeping my eyes peeled for a sixth. They're all different and interesting to look at, not to mention functional.

The pirate trunk, for example, is just the right size to fit (most of) our CD collection. I know this is an MP3 world, but I don't think we're going to be getting rid of the CDs any time soon because we're fuddy duddy like that. Actually, Tony keeps adding to the collection. When I'm scoping out pirate trunks and purty necklaces at garage sales, he gravitates toward the inevitable pile of CDs that the seller's trying to unload. He'll get them for a song (or free) and bring them home and upload them to iTunes.

Anyway, so we have this pirate trunk that holds CDs. The problem is ... it was hideous.


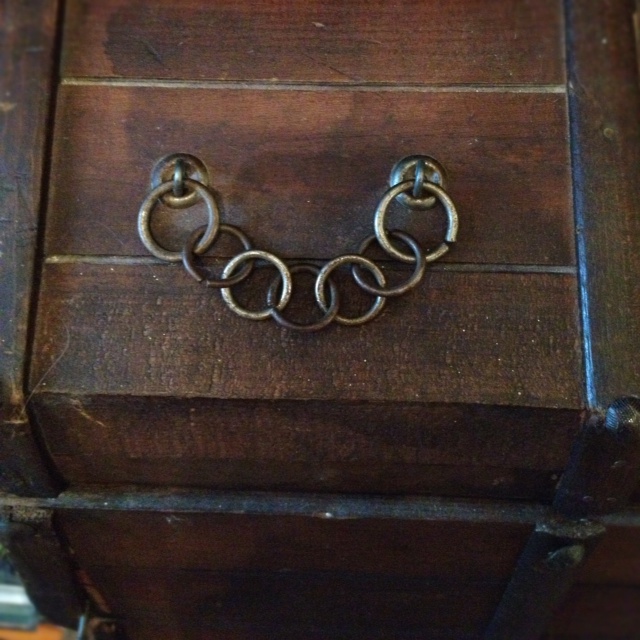
The trim on the left side was a broken disaster. And are those handles on the front?

And what's up with the chains?


A little wood glue and a nail fixed the trim problem, and spackle filled the holes. 

Tony is officially in charge of all demo projects in the house, so I enlisted him to remove the chains and diamond-shaped wood handles, which were also on the side of the trunk.

And then I took a paintbrush to that bad boy last weekend and gave him a new life as a white pirate trunk.


I (usually) love the way natural wood looks, so I cringe when I see people paint natural wood furniture. But not in this case, for two reasons. 

First of all, the trunk style is dated, and white paint made the piece more modern and look like it belongs in the house of young adults.

Second, the trunk was constructed with butt joints. Since my dad got into woodworking, I've gained an appreciation for the craftsmanship of joints. Dovetail joints, for example, take time to put together and will produce a sturdy piece of furniture. I just went around my house looking for dovetail joints, and the ones in my kitchen drawers are easy to see because they're two-toned:


Butt joints are an easy way out. Put two boards together, hammer a nail and call it a day. Bottom line, butt joints = non-heirloom-quality furniture = paint may be permissible, in my book.

I kept the original latch and just spray painted it when I painted the front door hardware.

White pirate trunk, where have you been all my life?

Wednesday, October 3, 2012

decor: trunk rehab

Several months ago, I saw a post on Freecycle for a wood trunk, and I'm a firm believer that when it comes to decor and storage in small spaces, you can never have too many trunks. The woman who was giving the trunk away acknowledged in her Freecycle post that it needed a little TLC. In fact, the trunk was hideous. It was dirty and bright blue with chipped paint. Tony picked it up for me and didn't even want to bring it in our house because he hated it so much.

But the trunk also had dovetail joints and rustic hardware. It was sturdy and large and full of character. I had big plans for this trunk.


My big plans were to clean the thing like crazy, then restore the natural wood, and then stain it a nice dark brown. When my parents came to visit last month, I asked my dad to strip the blue paint for me. First he tried a chemical stripper, which wasn't powerful enough to eat through the paint. Then he took a power sander to it, which did a good job at removing most of the paint. But we ran into trouble because the wood had so many nicks where the paint seeped in. The power sander couldn't get in those crevices, and it would've been a nightmare to sand it out by hand.


I experimented with staining over the blue spots, but the blue showed through the stain. So I decided to take an unconventional approach to the refinishing job: paint, then stain. The paint gave the trunk a good foundation color, and the stain highlighted the grain of the wood.


For the paint, I chose chocolate candy brown, a Benjamin Moore color from Frager's.


I put on two coats of paint, and once it was dry, I rubbed on dark walnut stain by Minwax. And I am so, so, so happy with how the trunk turned out. So happy. It's not how I originally envisioned it, but sometimes you've got to improvise.

Are you ready for the big unveil?

Ta da!


I have the trunk in the corner of my bedroom, and I'm using it to store photo albums.


Tony, by the way, has since changed his mind about the trunk. He loves it, too.

Friday, August 10, 2012

small spaces: blanket storage

Let me introduce you to my latest storage conundrum. Blankets. 


I've been cleaning out the closet in our second bedroom and under the beds, and I've discovered that Past Jessi tucked blankets everywhere. And when I gathered them up and put them all in one place, I realized I had a storage conundrum on my hands. Where in my teeny, tiny rowhouse am I going to store a sleeping bag, three crocheted blankets, two quilts, and three blankets? (And this is after I put three blankets in the Goodwill pile.)

I was talking to my mom on the phone about my storage issue, and my dad piped up. Between the mattress and box spring in your bed. Brilliant idea, Dad. Simply brilliant. He's an unexpected source for storage solution ideas, but I'll take it. I grew up in a really cute house in Northeast Ohio that was built in 1920. It's not as teeny, tiny as my D.C. house, but I would still call it quite small. My parents moved into a bigger house after I left for college (go figure), but my dad said he picked up a thing or two about storage solutions, having raised two kids in a small space.

So I laid out the blankets on top of the bed and arranged them to be relatively flat.


And under the mattress they went.


And there have been no princess-and-the-pea moments. Tony and I can't tell there are any blankets under there. 

And here's the layout under the guest bed: 


I put the last blanket under the couch cushions. This is the blanket we use in the wintertime when we watch TV on the couch, so it's in a convenient place once the weather cools down.


Jessi: 1. 

Storage conundrum: 0. 

Friday, June 22, 2012

the garden: the calm before the storm

Radishes. Lettuce. Herbs. Strawberries. Yeah, yeah, that's all been nice. But I'm ready for some substantial VEGETABLES from my garden. I was scoping things out last night, and I think this 100-degree weather has been good to my plants. It looks like it's only a matter of days now before we really start getting the summer harvest. 

My backyard is tiny. We'll call it "cozy." Which means I have to be creative about growing big vegetables that tend to spread, like cucumbers. I planted the cukes in pots, and they're growing up trellises. And it's working wonderfully. I'm about to pick the first one. 


And I have one cherry tomato that's about to turn. 


Oh, and I'm so close to picking these hot banana peppers.


Stay tuned in the next few days because it looks like I'll have some harvesting updates on my adventures in urban gardening.