Thursday, November 29, 2012

recipe: butternut squash risotto

I mentioned last week that our vegetarian Thanksgiving dinner was butternut squash risotto, cornmeal spoon bread, green beans with toasted almonds, cranberry sauce and caramel pecan pie. I've already posted the pie recipe, and I decided the spoon bread wasn't good enough to recommend to y'all. But I will endorse the risotto. And since it's almost December, if you're gonna make it, you better make it soon, while it's still fall.

I'm posting this recipe toward the end of the week in case you're looking for something to make over the weekend. This risotto is great, but it's kind of involved, so it's better to make when you have some time on your hands. Not exactly a weeknight-friendly meal.


Butternut Squash Risotto
Adapted from America's Test Kitchen

  • 1 medium butternut squash
  • 2 tablespoons olive oil
  • 3/4 teaspoon salt, divided
  • 3/4 teaspoon pepper, divided
  • 4 cups low-sodium vegetable broth
  • 1 cup water
  • 4 tablespoons unsalted butter, divided
  • 1 1/2 cups minced onions (about 2 small onions) 
  • 2 teaspoons minced garlic (about 2 medium cloves) 
  • 2 cups arborio rice
  • 1 1/2 cups dry white wine
  • 3/4 cup grated Parmesan cheese
  • 2 tablespoons minced fresh sage
  • 1/4 teaspoon nutmeg

Peel the butternut squash. Remove the fibers and seeds and set aside. (An ice cream scoop works well for this.) Cut squash into 1/2-inch cubes for a total of 3 1/2 cups. Reserve any remaining squash with the fibers and seeds.

Heat olive oil in a skillet. Add squash in an even layer and cook without stirring for 5 minutes until squash is golden brown. Stir in 1/4 teaspoon salt and 1/4 teaspoon pepper. Cook 5 more minutes, stirring occasionally, until squash is tender and brown. Transfer squash to a bowl, cover with foil, and set aside.


Return empty skillet to medium heat, add squash fibers, seeds and leftover diced squash. Cook 4 minutes until lightly browned. Transfer to large saucepan. Add broth and water. Cover sauce pan and bring mixture to a simmer over high heat. Reduce heat to medium-low to maintain a light simmer.

Melt 3 tablespoons butter in the skillet over medium heat. Add onions, garlic, 1/2 teaspoon salt and 1/2 teaspoon pepper. Cook 5 minutes until onions are soft.

Add rice to the skillet and cook 3 minutes, stirring frequently, until grains are translucent around the edges. Add wine and cook 5 minutes, stir frequently, until liquid is fully absorbed.

Strain broth through fine mesh strainer into a medium bowl, pressing on the solids to extract as much liquid as possible. Throw the solids away.

Return strained broth to sauce pan, cover, and set over low heat to keep hot.

When wine is fully absorbed, add 3 cups broth and 1/2 of the reserved squash to rice. Simmer about 12 minutes, stirring every 3 to 4 minutes until liquid is absorbed and pan is almost dry. 

Stir in 1/2 cup broth and cook 3 minutes, stirring constantly until absorbed. Repeat with additional broth until rice is cooked through but grains are somewhat firm at center.

Off heat, stir in remaining 1 tablespoon butter, cheese, sage and nutmeg. Gently fold in remaining reserved squashed. If desired, add up to 1/4 cup more broth to loosen texture of risotto.


Serves like 20. Or seems like it. Let's say it serves 8. We had risotto coming out of our ears for days.

Sidenote: I divided the risotto in half and only added cheese to Tony's half to keep mine dairy-free. He tasted both and said they tasted exactly the same.


P.S. As you can see, we are a Canned Cranberry Sauce Family. I know there are some Homemade Cranberry Sauce Families out there, and there's no judgement over here. We can coexist despite our fundamental differences. No shame.

Wednesday, November 28, 2012

decor: pirate trunk makeover

About a year ago, Tony and I stopped at a moving sale in our neighborhood and scored big time. I got a midcentury orange chair to match my living room decor for $5, some necklaces (including the one I wore to this wedding) for $1 each, flower pots for 10 cents apiece and a pirate trunk for $10. The stuff was priced to sell.

I've blogged before about the trunks in my house. (Exhibit A. Exhibit B.) I have five trunks and actually have been keeping my eyes peeled for a sixth. They're all different and interesting to look at, not to mention functional.

The pirate trunk, for example, is just the right size to fit (most of) our CD collection. I know this is an MP3 world, but I don't think we're going to be getting rid of the CDs any time soon because we're fuddy duddy like that. Actually, Tony keeps adding to the collection. When I'm scoping out pirate trunks and purty necklaces at garage sales, he gravitates toward the inevitable pile of CDs that the seller's trying to unload. He'll get them for a song (or free) and bring them home and upload them to iTunes.

Anyway, so we have this pirate trunk that holds CDs. The problem is ... it was hideous.


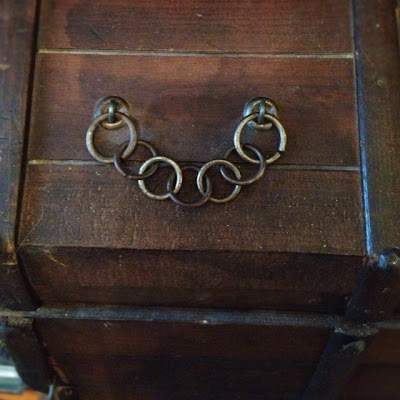
The trim on the left side was a broken disaster. And are those handles on the front?

And what's up with the chains?


A little wood glue and a nail fixed the trim problem, and spackle filled the holes. 

Tony is officially in charge of all demo projects in the house, so I enlisted him to remove the chains and diamond-shaped wood handles, which were also on the side of the trunk.

And then I took a paintbrush to that bad boy last weekend and gave him a new life as a white pirate trunk.


I (usually) love the way natural wood looks, so I cringe when I see people paint natural wood furniture. But not in this case, for two reasons. 

First of all, the trunk style is dated, and white paint made the piece more modern and look like it belongs in the house of young adults.

Second, the trunk was constructed with butt joints. Since my dad got into woodworking, I've gained an appreciation for the craftsmanship of joints. Dovetail joints, for example, take time to put together and will produce a sturdy piece of furniture. I just went around my house looking for dovetail joints, and the ones in my kitchen drawers are easy to see because they're two-toned:


Butt joints are an easy way out. Put two boards together, hammer a nail and call it a day. Bottom line, butt joints = non-heirloom-quality furniture = paint may be permissible, in my book.

I kept the original latch and just spray painted it when I painted the front door hardware.

White pirate trunk, where have you been all my life?

Tuesday, November 27, 2012

home improvement: updating door hardware

As our house has come together over the past year and a half, it seems the little home improvement projects have made the biggest impact. Painting walls. Painting trim. Replacing outlet covers, light switch plates and air vents.

Add to that list: spray painting door hardware. Meet our newly updated front door:


Last week, I came across this blog post about transforming door hardware, and I had to try it ASAP because our front door has been driving me crazy. Let me present the "before" photo:


The mail slot and hinges had been painted over, the handle was pewter, and the deadbolt was gold. Clearly the hardware had been cobbled together by the previous owners over a period of time. After spray painting the mail slot, handle and lock (the rusty hinges will wait for another time), the door doesn't look haphazard.


Tony and I woke up Saturday morning and headed straight to Lowe's in New Carrollton. (Well, we headed straight to Lowe's after stopping at the Salvation Army and Community Forklift -- can't miss those if we're heading out all that way. And I bought a large vintage yellow Pyrex mixing bowl for $1.99. SCORE.)

Anyway, I narrowed the paint colors down to four choices, which I laid out for Tony to choose. And he was adamant that we go with oil rubbed bronze (second from the right). I personally had been leaning toward satin black (second from the left). But Tony doesn't often express a strong opinion when it comes to decor and color choices, so when he does, we tend to go with it. And guess what -- he's a genius because oil rubbed bronze is perfection. (Also pictured: glossy black on the far left and flat black on the far right.)


Since the paint cans are backward in that photo (it was a blind choice for Tony), you can't tell the brand, but it's Rust-Oleum Universal paint and primer for indoor and outdoor use.

We got to work when we got home. I have had zero experience with removing and replacing locks and door handles, but it's surprisingly easy. All you need is a screwdriver.


I brought everything outside and laid it out on my trusty drop cloth, which (clearly) has seen its share of previous painting jobs.


Per my dad's recommendation, everything got a good scruffing up with 0000 steel wool. (That's pronounced "four ought" if you want the lingo.) Paint sticks better to a rough surface. Then I wiped everything clean with multipurpose cleaner.

I taped off the bottom of the lock to protect it from the paint. I also put the extra key in the lock, so paint couldn't get in the keyhole.


The lock and handles wouldn't balance by themselves, so I set them up between to bricks. I used the same trick to paint the tops of the screws. I turned the locks and knobs between coats to make sure nothing was sticking.

I used a toothpick to prop the mailslots open during painting, and I moved the toothpick to a different spot for each coat.

I gave everything about five very, very light coats of spray paint, letting it dry for at least 10 to 30 minutes between coats, depending on how distracted I got. As my dad explains it, the paint will adhere better if it's applied this way.

And now, the hardware on the other doors in the house is starting to drive me crazy. I'm going to live with the newly painted locks for a while to make sure there aren't any chipping issues, and then I'm going to bust out the spray paint again.


Small fix -- big impact.

Monday, November 26, 2012

recipe: caramel pecan pie

Hello, pie!


Tony and I had a really relaxing holiday, just the two of us this year. We spent the day cooking together and eating together and otherwise relaxing together. (The rest of the weekend was a different story -- we stayed busy doing a whole bunch of projects around the house.)

For Thanksgiving, I mentioned I'd be making a caramel pecan pie. I got the recipe from my mom, and it turned out to be fantastic.


The recipe calls for 36 caramels, so it's super, super, super rich. If you have a sweet tooth, this recipe is for you. 


Caramel Pecan Pie

  • 1 unbaked pie crust
  • 36 caramels
  • 1/4 cup butter
  • 1/4 cup milk
  • 3/4 cup sugar
  • 3 eggs
  • 1/2 teaspoon vanilla
  • 1/4 teaspoon salt
  • 1 1/2 cups pecan halves 

First of all, I got this recipe from my mom, which means I used my grandma's pie crust recipe. Which is a family secret, so I can't put it on the Internet. Sorry. But check out a similar recipe from America's Test Kitchen here. (But only make half of the recipe because this pie has a bottom and not a top.)

Place caramels in the freezer for a few minutes, which will make them easier to unwrap. (Unwrapping was Sous Chef Tony's job.)


In a sauce pan, combine caramels, butter and milk. (As a sidenote, I almost exclusively use soy milk in my recipes because that's what we buy at the grocery store, and soy milk and cow's milk work nearly identically in most recipes.)


Cook over low heat, stirring constantly until smooth.

When mixture becomes smooth, take off heat and set aside.

In a separate bowl, beat together sugar, eggs, vanilla and salt. (I used my handheld egg beater, which is perfect for little jobs like this.)


Mix in melted caramel mixture. Stir in pecans.

Pour into unbaked crust. Cover with a pie crust shield.


Bake at 350 degrees for 45 minutes. Remove crust shield and bake 5 minutes more. As the pie cools, it will firm up.


Friday, November 23, 2012

decor: now christmas starts

I didn't want to say anything until Thanksgiving had passed, but now that it's officially Christmas season, I feel comfortable telling you that I've had this cute little bastard in my bathroom for weeks.


Two bucks at Bed Bath and Beyond. Love him.

This weekend, the rest of our Christmas decorations are coming out, and our halls are going to get decked!

Thursday, November 22, 2012

life: meet my turkey

Say hello to our Thanksgiving turkey!


PSYCH! That's a butternut squash.

Tony and I are on our own this year for Thanksgiving. Work schedules are keeping us in D.C. for the holiday instead of in Ohio with our family. And since I'm the one cooking Thanksgiving dinner, ain't no turkey on the menu.

Today we'll be having butternut squash risotto, cornmeal spoon bread, almond green beans, cranberry sauce, caramel pecan pie, and egg nog. Most of these are new recipes for me, and I'll post the keepers on the blog. (I have particularly high hopes for the cornmeal spoon bread and the caramel pecan pie.)

But damn do I miss my family today. I miss my spot at the kids' table. I miss the inevitable conversation about Cleveland news personality Wilma Smith. (I don't know why they always must talk about her. But they do. Every Thanksgiving. For decades.)

But I have Tony and the cat and a beautiful house, and for that I am grateful. We are happy and in love and have several episodes of Downton Abbey to enjoy today.

And we will have a little bit of Ohio in our home today. Tony's family has a tradition to do a craft together every Thanksgiving, and we got a package in the mail yesterday from his aunt with the supplies we'll need to do our craft from afar. It was sweet of her.


Happy Thanksgiving, world.

Wednesday, November 21, 2012

recipe: bloody mary

A year ago, Tony and I hosted a big Christmas brunch open house for our friends. We served mimosas and sangria, and we also wanted to have Bloody Marys. But neither of us really knew how to make them. We asked around, but no one we knew had a good recipe either. So Tony sat down at the computer and and gave himself an education in the nuance and art that is Bloody Mary making. Thank you, Internet. They were a definite hit at brunch.

And now, just in time for the long holiday weekend, I will bestow that knowledge unto you. Here's the Bloody Mary that Tony made me a couple of weekends ago when we had our neighbors over for brunch:


After Tony perfected this recipe, I kind of got spoiled. I tried to drink a Bloody Mary from a mix once, and I couldn't finish it. It tasted like tomato poop.

Tony's Bloody Mary
  • 2 shots vodka
  • 8 ounces tomato juice
  • 3 dashes worcestershire sauce
  • 5 shakes Tabasco
  • lots of pepper
  • splash lemon juice
  • 1/4 teaspoon horseradish
  • celery stick

Combine vodka, tomato juice and seasonings in a shaker. Shake. Pour into glass over ice. Serve with a celery stick.

Tuesday, November 20, 2012

decor: mantel

I have a very large gold eagle in my living room.

And. It. Is. Outstanding.


This is the story of my fireplace. Or at least, the top half of my fireplace. The bottom half isn't ready for prime time yet.

I have an exposed brick wall and fireplace in my living room, which is one of the house's natural charms. It also was an intimidating decor challenge because it was a completely blank canvas. Here's a photo of the living room that I took during our home inspection:


That's a cubby to store wood right next to the fireplace opening, which makes the space awkward. It would've been nice to find an old, ornate frame mantel to surround the fireplace opening, but I didn't think it would look right with an unadorned cubby next to it. I eventually decided that a floating mantel above both the fireplace and the cubby would work best with the space, and I set my dad loose on the project. He worked some woodworking magic and came up with this beauty.


Once the mantel was up, the living room got its focal point.

And then the decor elements started coming together, after some trial and error. 

The antique mantel clock was an obvious choice. This was a Christmas present from my parents/Santa several years ago, and I love it. It requires a key to wind it up, and the tick-tock is like the heartbeat of the house. I can wake up at 3 o'clock in the morning, listen closely, and I know the clock will be ticking.


As for the frames, I found them at thrift stores and yard sales. The gold gives the space some glamour, and the pictures I have in them keeps everything young.


And the creme de la creme is my gold eagle.

And here's how the eagle came to be. I told you how Tony and I went to Ohio this fall to see Adrian and Gretchen. Adrian had recently quit his job to start his own business as an auctioneer, which is an inspiring, entrepreneurial story for another time. At any rate, before the auction, I was looking at the online catalog of what he was going to sell, and I saw a cast iron eagle. It's the kind of thing you see hanging over people's garages or barns when you drive through the heart of the country. And then I imagined how unexpected and modern and just fabulous it would be to paint the eagle gold. And to hang it over my fireplace. So I got this idea in my head, and I mentioned it to my parents, and it turns out, my dad just happened to have an extra fiberglass eagle laying around. (I know - what. But he did.)

So I brought it back to D.C. and DIY'd myself a gold eagle with some shiny Martha Stewart paint from Home Depot. And that is how an eagle landed in my living room.


Now, the wood burning fireplace is functional, but Tony and I decided that we aren't going to use it. We won't block it off, though, so the next owners can use it. So I've been playing around with what I can put in the fireplace and the cubby to utilize the space for extra storage and still look nice in the centerpiece of my home. And I'm still moving things around to see what looks best. I'll do another post when I have it figured out, though!

Monday, November 19, 2012

the garden: bulb planting time

The tree lawn in front of my house has been difficult to maintain. The area gets a lot of foot traffic, especially from dogs who are in need of a bathroom. I don't want a big square of dirt in front of my house, but the annuals that I've tried planting there have gotten trampled.

So here's the new plan. Little crocus flowers will bloom first, in late winter. When spring comes and the crocus go away, the tulips will come up. And then the daffodils later in the spring. And then, as the daffodil foliage is starting to die, hostas will come up, covering the dead bulb foliage and keeping the whole area green until the next winter. That's the plan.

I put the daffodil bulbs in the tree lawn last season. And my parents divided some of their hostas for me, and we planted them earlier this fall.

And this past weekend, I planted the crocus and tulip bulbs.

Here's the thing about crocus and tulips, though. Squirrels like them. Apparently they're tasty. The interwebs recommends planting the bulbs under chicken wire, so squirrels can't dig them up, but I didn't  have the motivation to go to that trouble. So I'm trying to ward off the squirrels with another internet-recommended remedy: medicated foot powder. Apparently squirrels do not like the smell or something.


I squirted some of the medicated foot powder in a plastic bag, then threw in the bulbs and tossed everything around until the bulbs were coated.


For each hole I dug, I put in a bulb and then a squirt of medicated foot powder. I may have looked like a crazy person standing on the sidewalk with a trowel in one hand and medicated foot powder in the other.

So I'll let you know how it goes and whether the crocus and tulips sprout in the spring.

<3

In other garden news, my basil has all died, sadly, because it's been too cold. The peppers are still going strong, though. So are the lettuce and spinach. None of my radishes ever produced.

And the tomato aren't producing as much as they had been, but I'm still getting a few tomatoes, and the plants have green tomatoes and even some flowers.


Oh, and the celery -- it's still alive!

Saturday, November 17, 2012

the garden: goodbye, leaves

I went to do some Christmas shopping this morning, and when I came home, Tony had raked up FIVE bags of leaves from our front yard. Which may not sound like a lot, but our front yard is the size of a postage stamp.


Our tree dumped pretty much all of its leaves in the past few days. In fact, early this week, I was thinking I should post a photo of the beautiful yellow leaves outside our bedroom window. Too late.

Friday, November 16, 2012

decor: closet shopping

My hands-down favorite place to go shopping for home decor is ... my mom's basement. There are decades worth of flea market, antique store and thrift store finds in storage in that basement. Oh, you aren't using that stool anymore, are you, Mom? Oh, that bowl would look so good in my house, Mom. She's a good sport about it.

On a related note, my second favorite place to go shopping? Grandma's basement.

And I've recently discovered my third favorite place: my own closet!

When Tony and I moved into our house, I got all organized. As we were unpacking, I gathered all of the home decor items that weren't going on display and put them all in a big pile. And then I sorted everything into four categories: small art, large art, household breakables and household miscellaneous. I put everything into large Rubbermaid containers and labeled them clearly. (Is it hoarding if everything is organized?)

A few weeks ago, I wanted to change things up around the house, so I dug out all of those containers and started rooting around. And several areas in my house ended up getting refreshed with things I forgot I even had. 

In the corner of the dining room, I have a dresser next to our table for extra storage, and here's how I ended up dressing up the area:


(The dresser, by the way, was a Freecycle find. I love its cool deco style, but it needs a fresh coat of white paint and a little TLC, so I'm not going to show it to you ... just yet.)

I'd forgotten about this print, which Tony and I bought at an art gallery in the middle of nowhere, Arizona, when we lived out west. I have my living room and dining room area done in turquoise with pops of orange, so the colors in this painting are perfect. I stole the matting from another painting that's in storage. And my dad and I made this frame and another identical one several years ago, and had intended to put my college diplomas in them, but we don't really have an appropriate space in my small house for displaying college diplomas. So I'm borrowing it for now.


The frame is stained light, and I like the way it looks next to this dark wood box:


I also brought that vintage planter out of storage. I'm kind of obsessed with old planters, by the way. I love the way they look, and they're perfect for storing all kinds of little stuff. TV remotes. Jewelry. Keys. Change. Love em.


And I've told you before the story about these vases. I dig how they look on the dresser. The sleekness and shininess of the vases and planter mix well with the roughness of the wood box and frame.


So that's my newest adventure in home decorating. I'll keep you posted on fixing up that dresser.

Thursday, November 15, 2012

recipe: spaetzle

When Tony was growing up, spaetzle (Eastern European dumplings) was a regular dish in his house, but, believe it or not, this Slovak girl had never had them before I met Tony. And I didn't know what I was missing all those years.


Tony and I made spaetzle one evening when we stayed at the Pennsylvania farmhouse. I even made it on that 1911 stove. The whole thing made me feel like I should be wearing a babushka.

Spaetzle With Sauerkraut

  • 1 can sauerkraut
  • olive oil
  • 5 eggs
  • 1/2 cup milk
  • 1 tablespoon salt
  • 3 cups flour
  • salt and pepper to taste

Bring a large pot of water to a boil.

Beat the eggs in a large bowl. Add the milk and salt. Stir in the flour. Let dough sit for 10 minutes.

Meanwhile, heat a generous amount of olive oil in a large frying pan. Drain the sauerkraut and add to frying pan. Cook over medium heat, stirring occasionally, while you prepare the dumplings.

Drop the dough into the boiling water, either with a spoon or with a special spaetzle maker. This is a spaetzle maker: 


You put the dough in that square compartment, place the spaetzle maker over the pot, and slide the compartment back and forth, which presses the dough through the holes:


Boil for about 5 minutes, stirring to ensure dumplings don't stick. Drain spaetzle and add to frying pan. Stir to combine with sauerkraut. Season with salt and pepper.

Serves about 6.

Wednesday, November 14, 2012

recipe: baked french toast

When you live in a rowhouse and your house touches your neighbor's, it makes life so much easier when you have friendly people next door. Tony and I are lucky to have great neighbors on both sides of us. Tony's cleaned out their gutters, and they've cleaned our leaves. They've picked up our mail when we're gone, and we watched their houses for storm damage.

Plus, when we hang out, it only takes about 7 seconds to get there.

On Sunday morning, Tony and I had one set of neighbors over for brunch, and we scheduled it on the early side (10 a.m.), so I decided to make baked French toast. It's a recipe that's put together the night before and requires minimal prep work in the morning.


I served the French toast with scrambled eggs, and Tony threw together some of his famous bloody Marys. (I'll have to post his Bloody Mary recipe soon. Bloody Marys from a mix aren't even in the same ballpark has homemade ones.)

Baked French Toast


  • small loaf of French bread

For egg mixture
  • 3 eggs
  • 1 cup milk
  • 1/3 cup brown sugar
  • 1 teaspoon vanilla
  • 1 teaspoon cinnamon

For glaze
  • 2 tablespoons butter, melted
  • 2 tablespoons brown sugar
  • 1/2 cup walnuts, chopped
  • 1/2 cup raisins

Grease an 11-by-7-inch baking dish. Cut the bread into about 11 or 12 pieces that are 1-inch thick each. Arrange in baking dish. 

For the egg mixture, in a bowl, combine eggs, milk, brown sugar, vanilla and cinnamon. Pour over bread. Cover and refrigerate overnight.

In the morning, remove the dish from the refrigerator and flip the bread slices. Most of the egg mixture will have been absorbed. Let sit for 30 minutes.

For the glaze, combine melted butter and brown sugar. Mix in walnuts and raisins. Pour over bread.

Bake at 400 degrees for 35 minutes.

Serves 4.